# TrackingIO Integration Solution
This article will introduce how to integrate Reyun TrackingIO data into the TE backend. The TE backend supports real-time callbacks for Reyun TrackingIO data.
TIP
Please note that data generated from integrating with third-party platforms will be included in the consumed data volume of the cluster.
# Summary
| Interface | Integration Type | Data Granularity | Attribution | Cost | Revenue | Impression | Click | Conversion |
|---|---|---|---|---|---|---|---|---|
| Real-time Callbacks | Callbacks | User Level | ✅ |
Before integrating Reyun TrackingIO data, please make sure you have read the TE System User Identification Rules and understand how TE identifies a user with #distinct_id and #account_id.
Currently, Reyun TrackingIO provides four callback interfaces for activation, registration, login, and payment. The Reyun TrackingIO Callback Link Document is available at the following link.
We recommend that you only integrate registration callback data to obtain attribution information about your customers. As the callback link needs to be operated by Reyun technical personnel, please contact Reyun technical personnel to configure the callback after obtaining all necessary information according to this section.
# Integration process
- Integrate the Reyun TrackingIO SDK and the TE SDK, and pass the TE SDK distinct ID into the Reyun SDK registration method.
- Log in to the TE backend, enter the third-party integration module, add the Reyun TrackingIO integration, complete the relevant configuration, and copy the callback address.
- Provide the app's APP_ID and Secret, callback address, and callback data type to Reyun technical personnel. Reyun technical personnel will assist you in configuring data transmission.
- Check whether the TE system has successfully received the data and complete the report construction.
# Client SDK Configuration
First, you need to import the Reyun TrackingIO SDK and the TE SDK into your application and complete the initialization configuration. The integration documents for the Reyun TrackingIO SDK and TE SDK are as follows:
# 1.1 Option 1 (automatic integration)
- If you are using TE SDK version 2.8.0~2.8.1, you can use this option directly.
- If you are using TE SDK version 2.8.2 and above, you also need to install a third-party data plugin. Please refer to the Android SDK integration document and iOS SDK integration document for details.
This solution is an automatic integration solution. Please call the following code to enable it after initializing the TE client SDK:
// Get the distinct ID of TE, which is TE's #distinct_id
String ta_distinct_id = ThinkingAnalyticsAPI.GetDistinctId()

// Use setEvent to report the account ID, which is TE's #account_id, to the Reyun server in the form of custom parameters.
HashMap<String, Object> params = new HashMap<>();
params.put("ta_account_id", ta_account_id);
Tracking.setEvent("event_name", params);

// Set the #distinct_id in TE as the account ID in Reyun and report it to the Reyun server.
Tracking.setRegisterWithAccountID(ta_distinct_id);
The principle of this solution is to internally call Tracking's setRegisterWithAccountID method and pass in the TE distinct ID.
# 1.2 Option 2 (manual integration)
The manual integration solution requires you to pass the TE distinct ID when calling setRegisterWithAccountID() in the Reyun SDK. Please note that the TE SDK initialization must be completed before the Reyun SDK initialization. The following code sample is for Android:
// Get the Distinct ID of TE, which is TE's #distinct_id
String ta_distinct_id = ThinkingAnalyticsAPI.GetDistinctId()

// Use setEvent to report the account ID, which is TE's #account_id, to the Reyun server in the form of custom parameters.
HashMap<String, Object> params = new HashMap<>();
params.put("ta_account_id", ta_account_id);
Tracking.setEvent("event_name", params);

// Set the #distinct_id in TE as the account ID in Reyun and report it to the Reyun server.
Tracking.setRegisterWithAccountID(ta_distinct_id);
# TE Platform Configuration
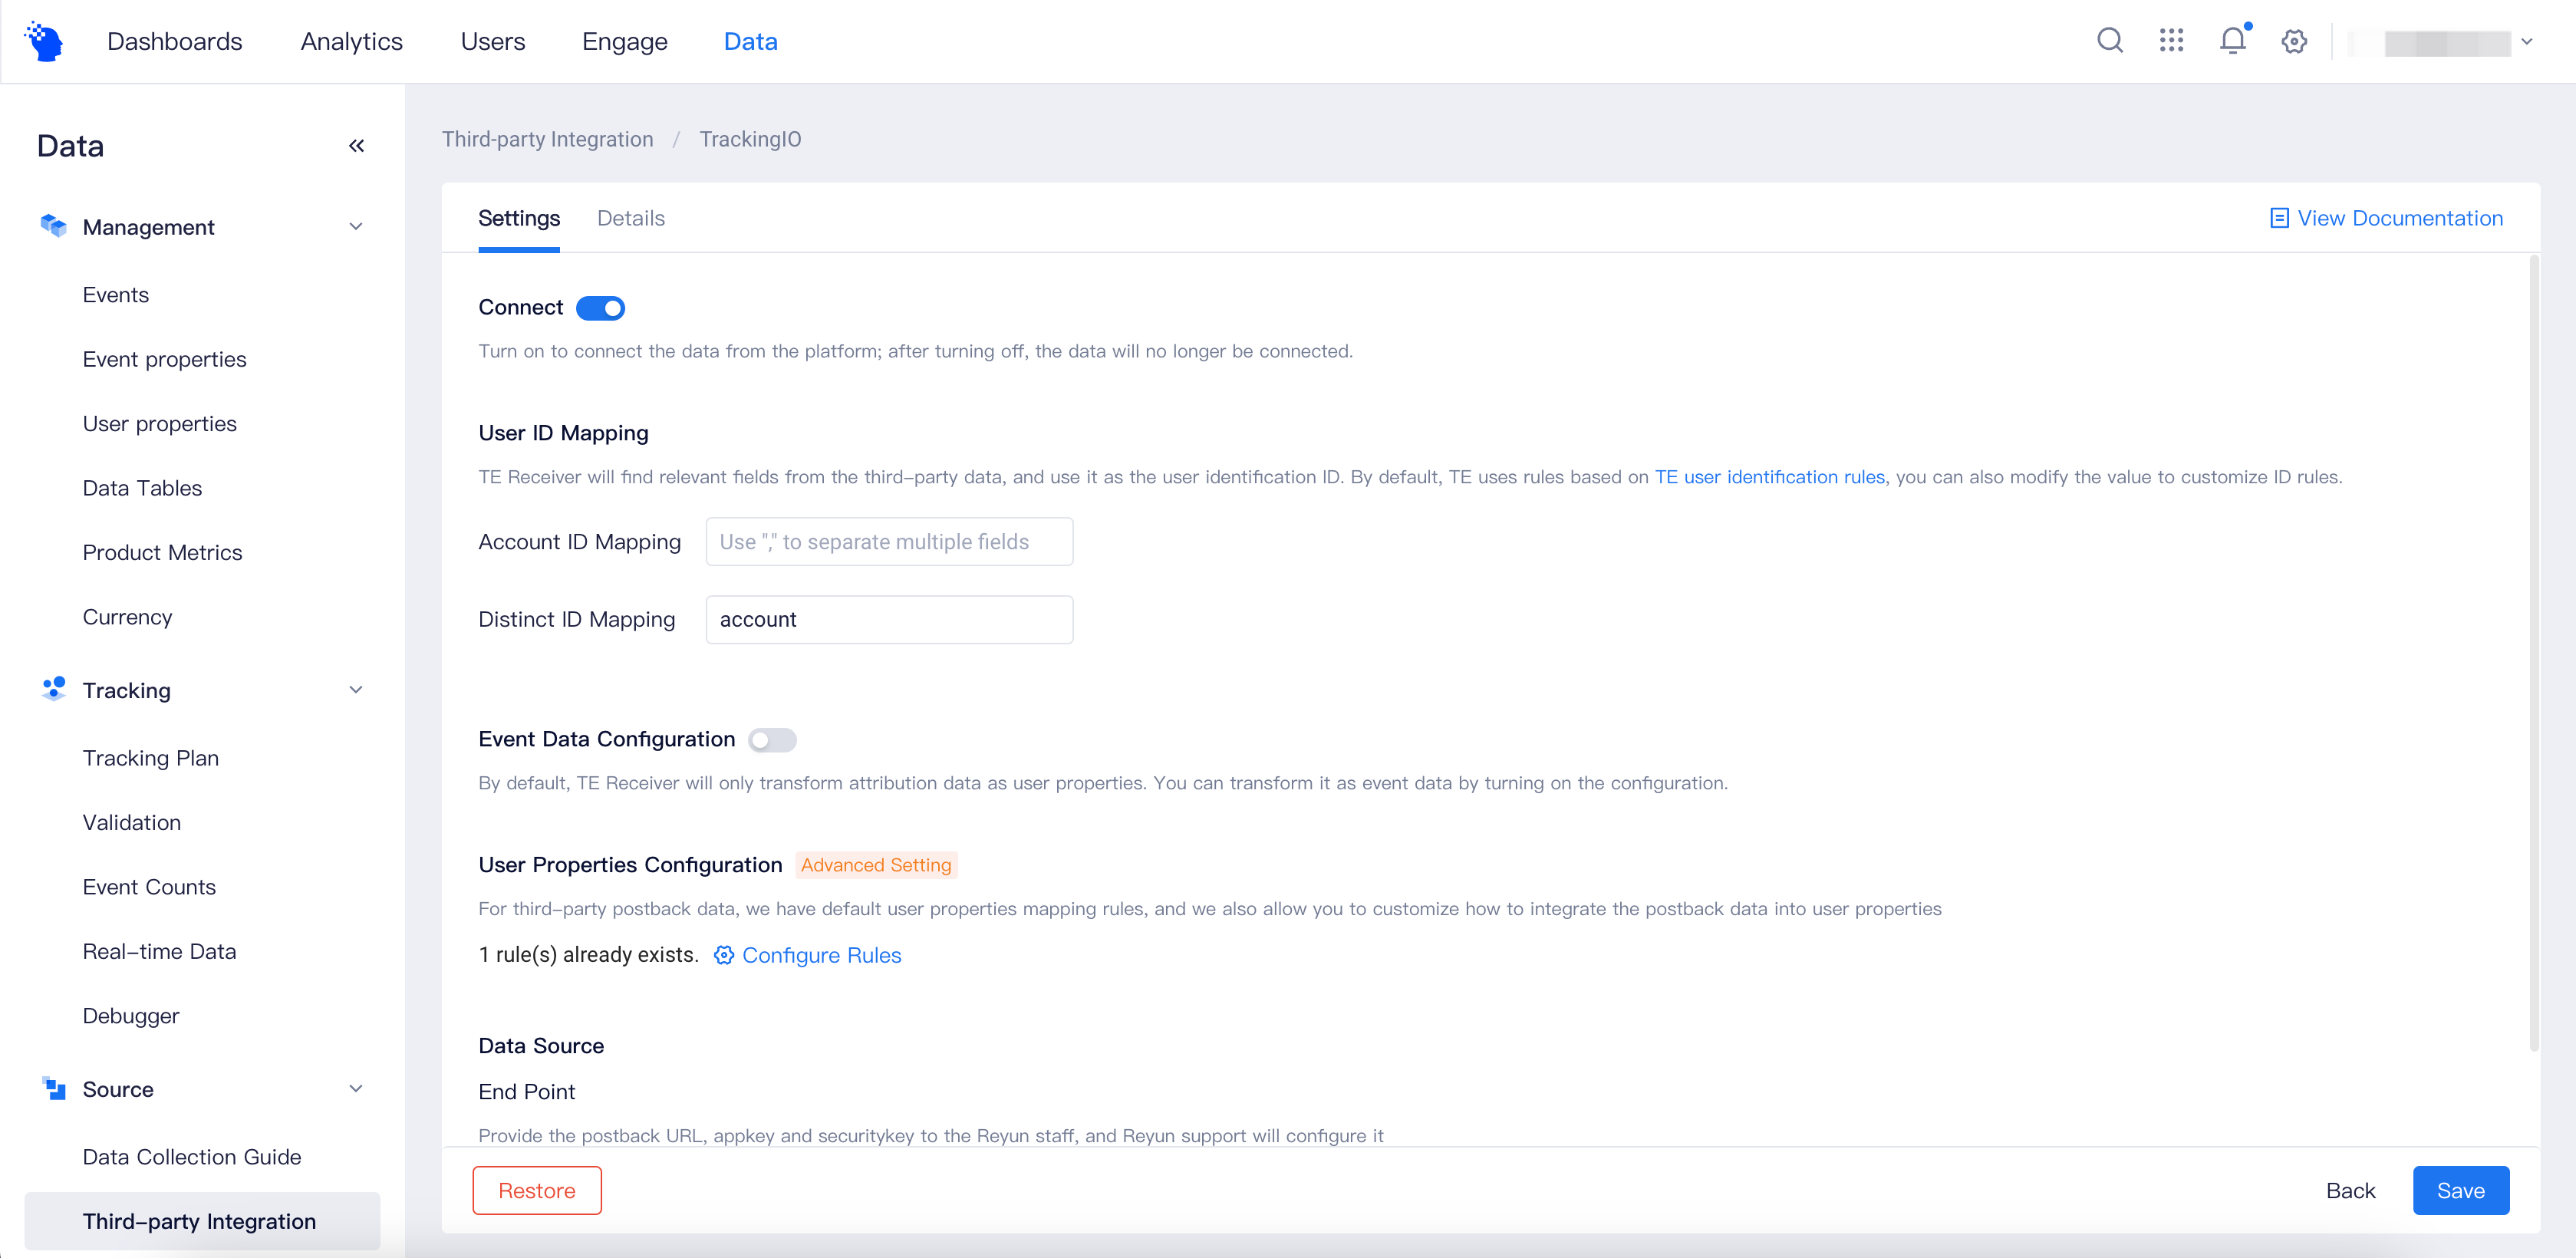
# 2.1 User ID Mapping
As Reyun sends user-level data, it needs to set user identification rules for #distinct_id and #account_id fields in the callback data. The TE system will set these fields as user identification fields in the data when converting the callback data according to this configuration. If you followed the client SDK configuration in this document, you can use the default values:
- Account ID Mapping: Not Filled
- Distinct ID Mapping: account

# 2.2 Event Data Configuration
After opening the "Event Data Configuration" switch, all data returned by Reyun TrackingIO will be written to the event table. We recommend that you enable event data storage.

# 2.3 User Properties Configuration
By default, the TE system will automatically write the attribution fields in the data returned by Reyun TrackingIO to the standardized user properties. The following are the fields and their meanings for writing user properties:
| Reyun TrackingIO Fields | Standardized Field | Explanation |
|---|---|---|
| ry_adgroup_name | te_ads_object.ad_group_name | Adset Name |
| channel | te_ads_object.media_source | Media Source |
| ry_adplan_name | te_ads_object.campaign_name | Campaign Name |
| ry_adcreative_name | te_ads_object.ad_name | Ad Name |
TIP
The default rules for user property storage for old versions are different from the current rules, please pay attention to distinguish. If you need to merge old and new properties, you can use the virtual property function.
If you need to make modifications, you can click "Configure Rules" to enter the rule configuration page, as shown in the figure below.
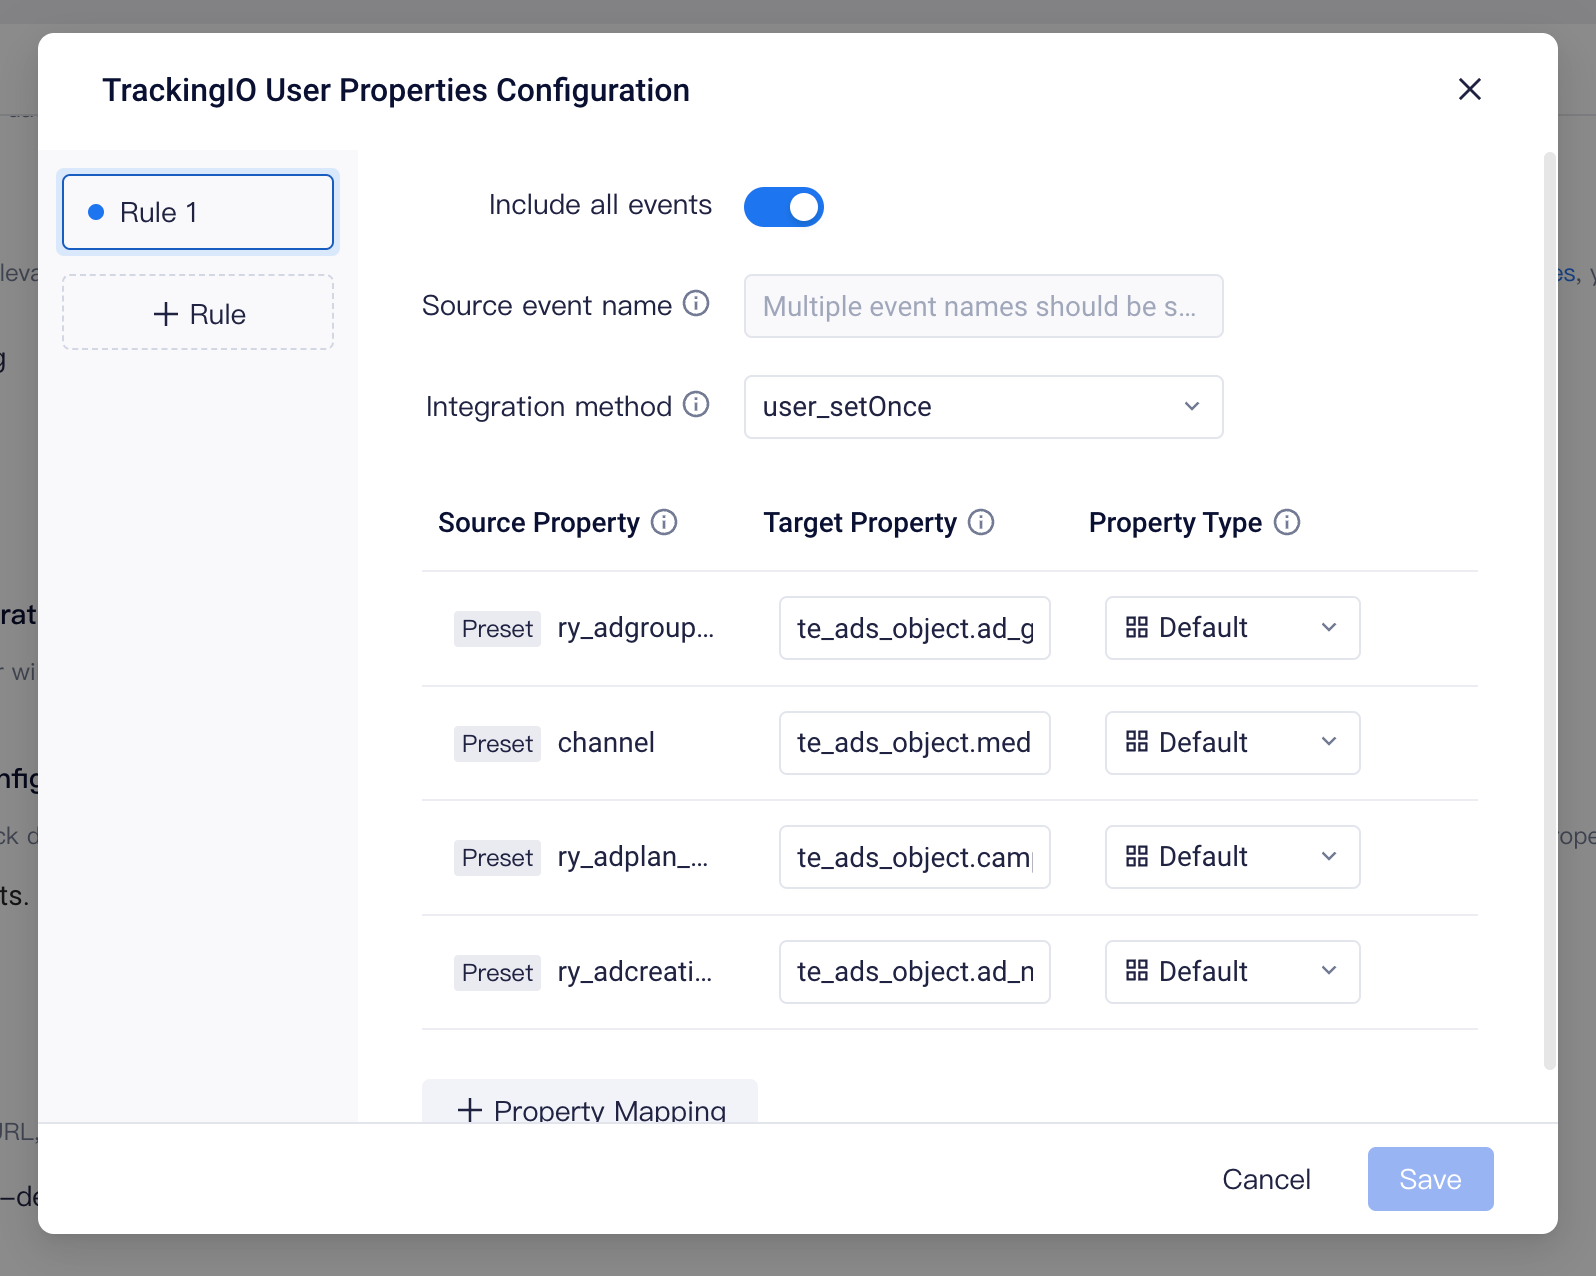
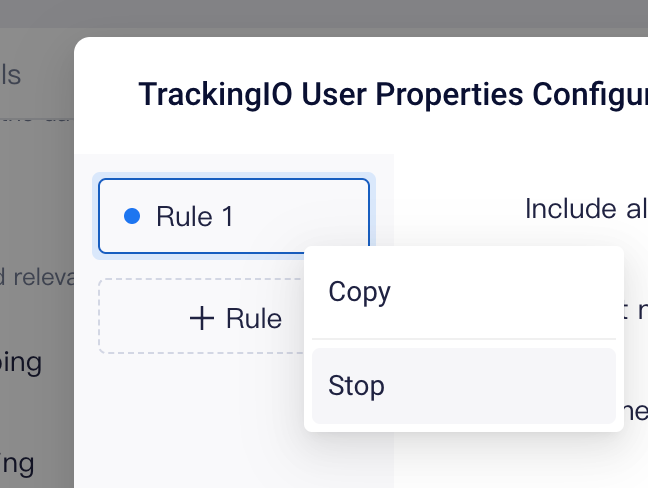
Here, you can modify which events the user properties come from and the storage method. The default storage method is user_setOnce, which only retains the information reported for the first time. You can click the "Property Mapping" button to add fields that need to be written to user properties, or click the "Rules" button on the left to add a new set of rules. If you want to stop user property storage, you can stop all rules:
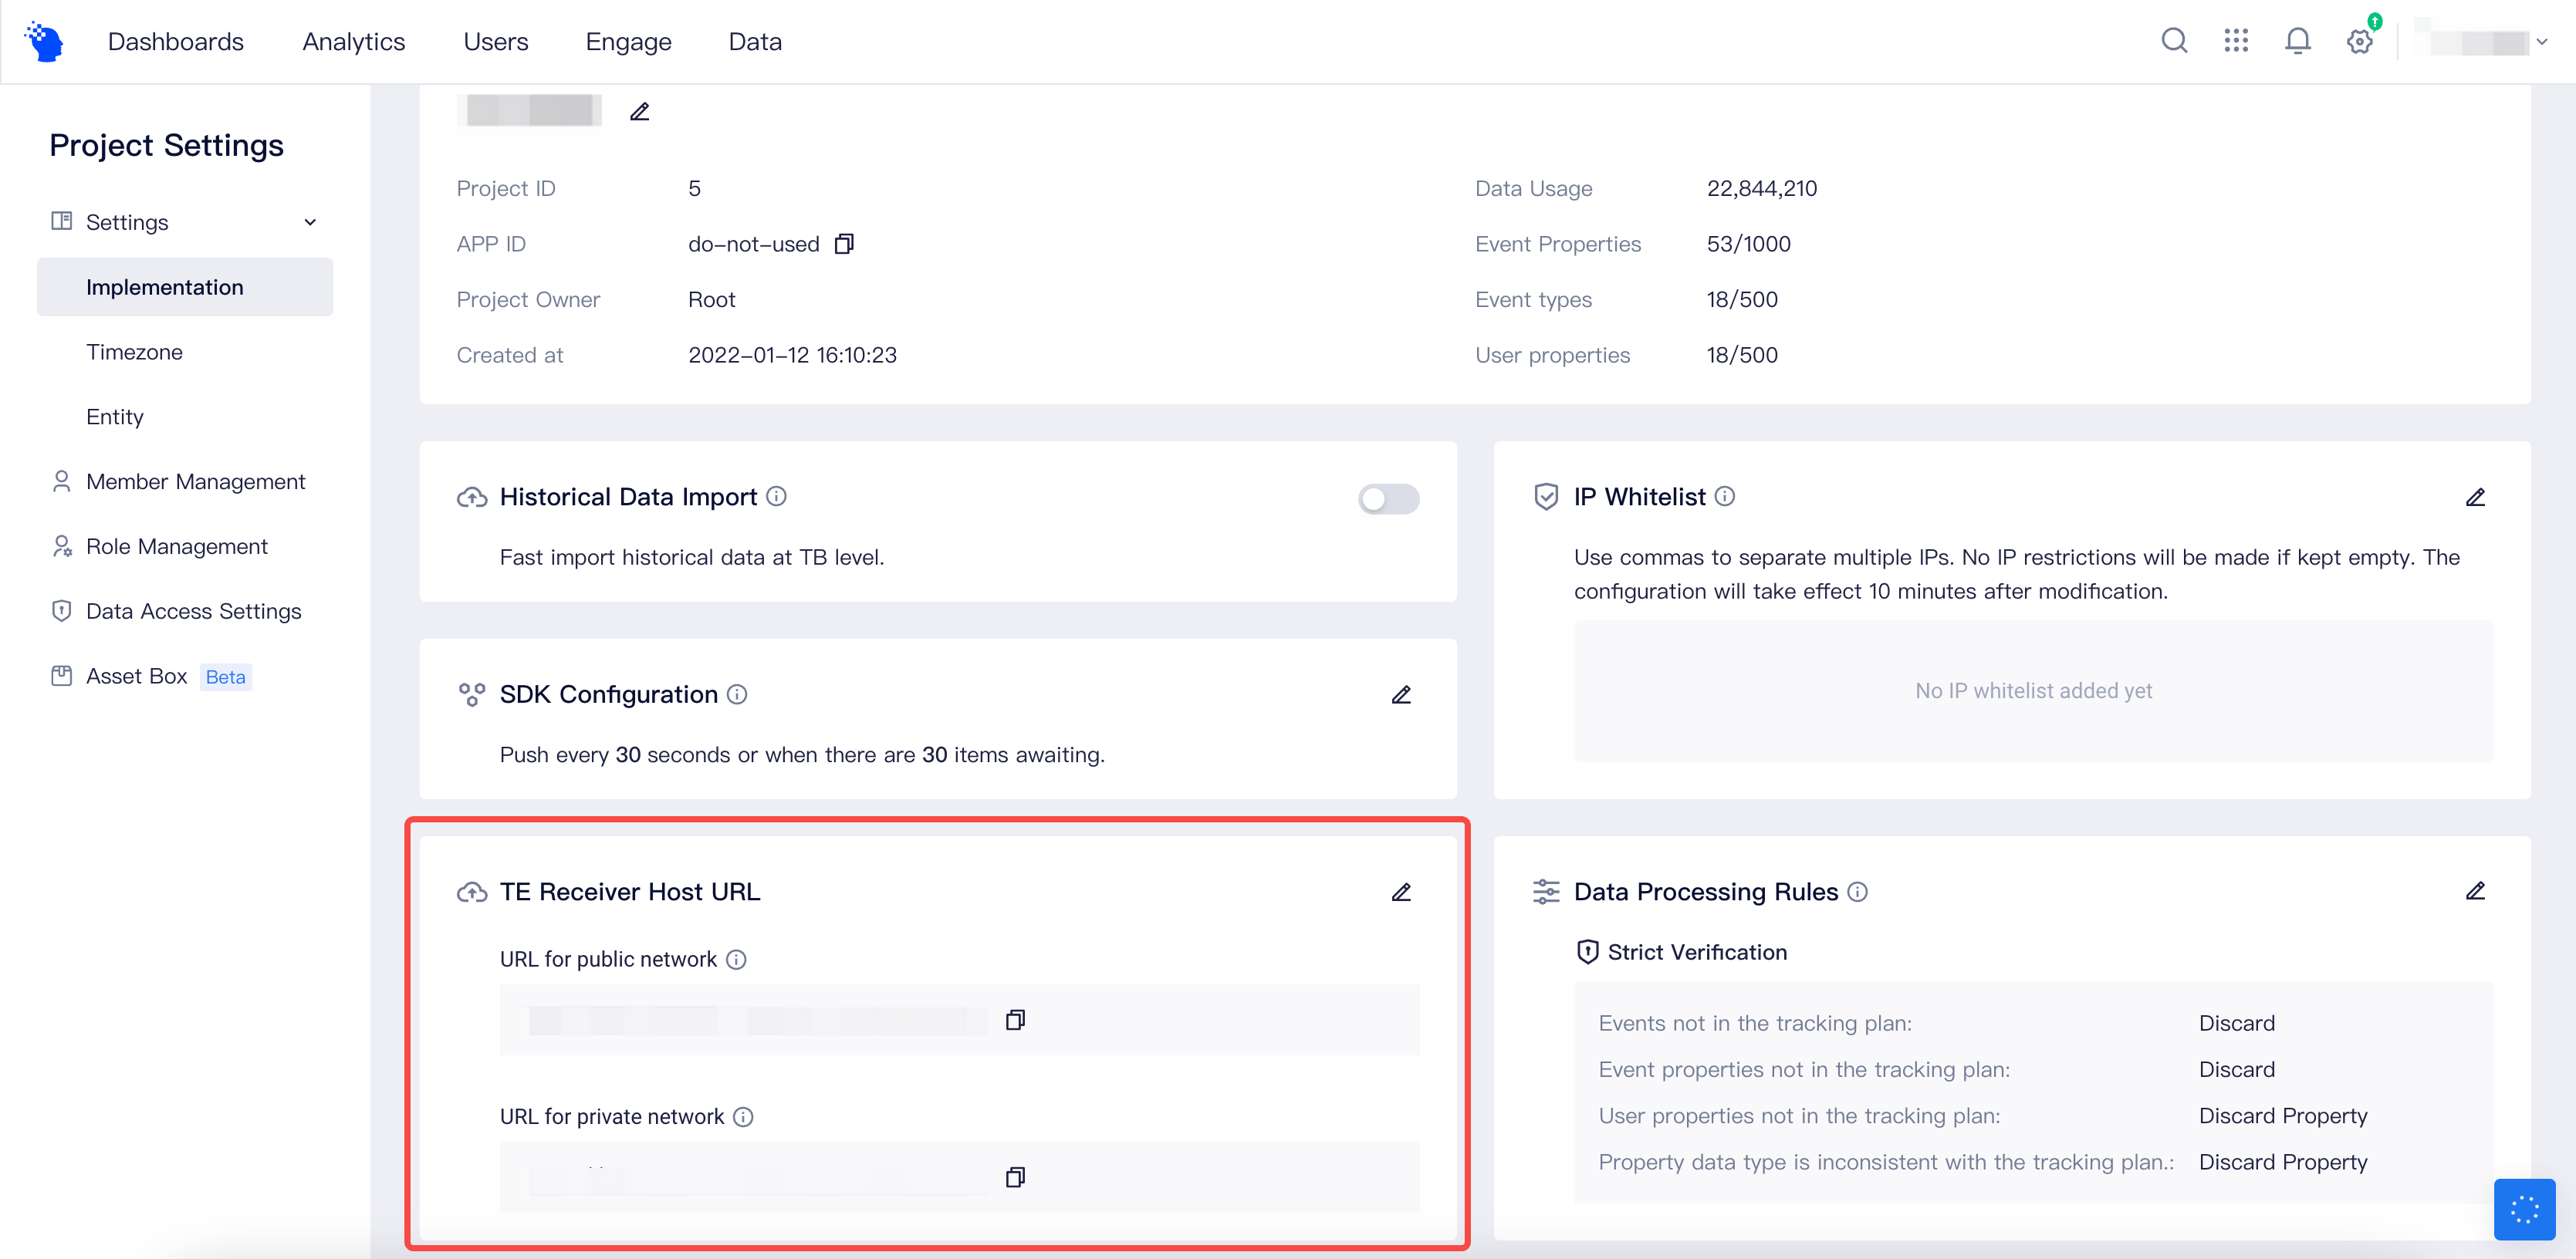
# 2.4 Data Source
The data source displays the address at which the TE system receives data returned by AppsFlyer. Please copy this address directly and fill it in when configuring AF return data in the following steps:

If there is no address displayed here, please go to the "Project Settings"-"Access Configuration"-"Data Reporting Address" in the upper-right corner menu to configure the public address. This address is the data reporting address configured in the TE SDK. After configuring, go back to the "Data Source" on the AppsFlyer configuration page to copy the terminal address.
# Contact Reyun Technical Support to Configure Callbacks
Next, you need to contact Reyun staff to enable callbacks. Typically, you will need to provide Reyun with the following four pieces of information:
| Information | Description | Example |
|---|---|---|
| Callback Data Type | The type of callback data you need to integrate | Activation callback or registration callback (choose one) |
| Callback URL | The address where the TE system receives callback data, obtained from the integration configuration page | https:// {receiver-host} /attribution/callback/reyun/ {app-id} |
| appkey | The unique identifier of the advertiser's product in Reyun's backend, obtained from the Reyun backend | f819f9cac******812b2067d0cf8 |
| securitykey | Security verification fields, currently not supported by TE and can be customized by the advertiser. | abc123 |
# Data Storage Logic
# 4.1 User Identification Rules
The TE system will identify users based on the configuration in "User ID Mapping" and associate user granular data passed back by Reyun with the corresponding user in the TE project.
The default rules are:
- Distinct ID: Check if the "account" field exists in the data passed back. If it does, set it as #distinct_id. If not, the data will be considered invalid and discarded.
# 4.2 Event Storage Rules
- Use the "activetime" field in the data as #event_time for the event.
- The event name for registration callbacks is "reyun_sign_up".
- All other fields configured in the callback link will be stored.
# 4.3 Standardized Fields
The following event properties will be standardized:
Here are all the event properties returned by the Reyun registration callback event, and some fields will be standardized:
| Original Field | Standardized Field | Meaning | Note |
|---|---|---|---|
| spreadurl | Promotion campaign shortlink | Click parameters, ASA attribution or natural user will not return these fields | |
| spreadname | Promotion campaign name | ||
| channel | te_ads_object.media_source | Channel name | |
| clicktime | Click reception time | ||
| uip | Click IP | ||
| csite | te_ads_object.placement | Ad space ID | |
| ry_adgroup_id | te_ads_object.ad_group_id | Ad group ID | |
| ry_adgroup_name | te_ads_object.ad_group_name | Ad group name | |
| ry_adplan_id | te_ads_object.campaign_id | Ad campaign ID | |
| ry_adplan_name | te_ads_object.campaign_name | Ad campaign name | |
| ry_adcreative_id | te_ads_object.ad_id | Ad creative ID | |
| ry_adcreative_name | te_ads_object.ad_name | Ad creative name | |
| advert_id | te_ads_object.ad_id | Ad ID | OceanEngine 2.0 exclusive parameters |
| advert_name | te_ads_object.ad_name | Ad name | OceanEngine 2.0 exclusive parameters |
| project_id | Project ID | OceanEngine 2.0 exclusive parameters | |
| project_name | Project name | OceanEngine 2.0 exclusive parameters | |
| mid1 | Image material ID | OceanEngine 2.0 exclusive parameters | |
| mid2 | Title material ID | OceanEngine 2.0 exclusive parameters | |
| mid3 | Video material ID | OceanEngine 2.0 exclusive parameters | |
| mid4 | Matching trial material ID | OceanEngine 2.0 exclusive parameters | |
| mid5 | Landing page material ID | OceanEngine 2.0 exclusive parameters | |
| mid6 | Android download details page material ID | OceanEngine 2.0 exclusive parameters | |
| accountid | Delivery account ID | Media delivery account | |
| requestid | Request issuance ID | Universal parameters of OceanEngine | |
| convertid | Conversion ID | Universal parameters of OceanEngine | |
| appkey | Reyun application unique identifier | ||
| activetime | Event reception time | ||
| what | Event type | ||
| osversion | System version | ||
| ryos | te_ads_object.platform | Operating system | |
| devicetype | Device type | ||
| deviceid | Device ID | ||
| Idfa | iOS IDFA | ||
| idfv | iOS IDFV | ||
| imei | Android IMEI, cannot be obtained for Android 10 and above | ||
| oaid | OAID | ||
| androidid | Android ID | ||
| aip | Conversion event IP | ||
| skey | Securitykey, meaningless | ||
| attribution | ASA attribution | ASA parameter, returned only when ASA ad attribution is present | |
| orgid | Ad campaign group ID | ||
| campaignid | Campaign ID | ||
| clickdate | ASA ad click time | ||
| adgroupid | Ad group ID | ||
| keywordid | Keyword ID | ||
| creativesetid | Material ID (creative ID) | ||
| conversiontype | Conversion type, new or reinstallation | ||
| account | Account ID set during registration | TE Distinct ID |
# 4.4 User Properties storage rules
- Associate event data with the corresponding TE user based on the user identification rules
- Determine the user attribute setting logic as user_set, user_setOnce, or user_add based on the user attribute storage rules
- Obtain the fields that need to be written to the user attributes from the specified or all events, and write them as given attribute names and types in the user table
# Data Storage Check
Finally, please check whether the TE system has received the data returned by Reyun. You can check it in the following ways:
- Check in Details Tab Page
If the platform access status is "Accessed", it means that the data has been received from the platform and stored. At this point, you can view the last 1000 received data on the "Details" tab of the Integration page. Click on a specific row to view the details of the data, including the data before and after conversion, and you can copy or export the data, or click the download button on the upper right corner to download the complete data:

- Check in other product modules
In addition to the integration page, you can also check whether the returned events and user attributes are created in the "Data Management" page.
You can also check whether the data is stored by analyzing the data in analysis models, such as event analysis models and user attribute analysis models.