# AppsFlyer Integration Solution
This article will introduce how to integrate AppsFlyer data into the TE platform. Currently, the TE platform supports integration with AppsFlyer's Push API. Please refer to the Push API documentation (opens new window) for more information.
TIP
Please note that data generated from integrating with third-party platforms will be included in the consumed data volume of the cluster.
# Summary
| Interface | Integration Type | Data Granularity | Attribution | Cost | Revenue | Impression | Click | Conversion |
|---|---|---|---|---|---|---|---|---|
| Push API | Callbacks | User Level | ✅ | ✅ | ✅ | ✅ | ✅ |
AppsFlyer Push API (opens new window) provides real-time AppsFlyer user-level data, including ad impressions, clicks, activations, revenue data, etc. Cost data may not be available due to data limitations on the AF platform.
Before integrating with AF's data, please ensure that you have read the TE system user identification rules and understand how TE identifies a user through #distinct_id and #account_id.
# Integration Process
- Integrate the AppsFlyer client SDK (opens new window) and TE SDK, and set TE's user recognition ID in the AF SDK.
- Log in to the TE platform, enter the third-party integration module, add the AppsFlyer integration, and complete the relevant configuration.
- Log in to the AppsFlyer platform and complete the data return configuration.
- Check whether the TE system has successfully received data
# Client SDK Configuration
The first step in integrating AppsFlyer data is to complete the integration of the TE SDK and AF SDK in the client, and set the user identification ID of the TE system in the AF SDK.
# 1.1 Option 1 (automatic integration)
- If you are using TE SDK version 2.8.0~2.8.1, you can use this option directly.
- If you are using TE SDK version 2.8.2 and above, you also need to install a third-party data plugin. Please refer to the Android SDK integration document and iOS SDK integration document for details.
This option is an automatic integration option. Please call the following code after initializing the TE client SDK to enable it:
// Initialize the TE SDK
ThinkingAnalyticsSDK instance = ThinkingAnalyticsSDK.sharedInstance(this, TA_APP_ID, TA_SERVER_URL);

// Enable the AppsFlyer ID association function of the TE SDK
instance.enableThirdPartySharing(TDThirdPartyShareType.TD_APPS_FLYER);

// It is strongly recommended that you set the visitor ID again using setCustomerUserId()
String distinctId = ThinkingAnalyticsAPI.GetDistinctId();
AppsFlyerLib.getInstance().setCustomerUserId(distinctId);

// Initialize the AppsFlyer SDK
AppsFlyerLib.getInstance().init("appid", null, this);
AppsFlyerLib.getInstance().start(this);

// After calling the TE SDK's login to set the account ID, you need to synchronize the data with the AF SDK again
instance.login("account_id");
instance.enableThirdPartySharing(TDThirdPartyShareType.TD_APPS_FLYER);
TIP
If you call the login() or identify() method of the TE SDK, you need to call enableThirdPartySharing() again to synchronize the data.
If you also need to call the setAdditionalData() method of the AF SDK, calling this method multiple times will overwrite the previous parameters. Therefore, you can pass the parameters to the TE SDK as shown in the following code, and the TE SDK will internally concatenate and merge the parameters.
Map<String, Object> additionalData = new HashMap<>();
additionalData.put("af_test_key1", "test1");
additionalData.put("af_test_key2", "test2");
instance.enableThirdPartySharing(
    TDThirdPartyShareType.TD_APPS_FLYER,
    additionalData
);
The principle of this option is to automatically call the AF setAdditionalData() method internally, passing in the visitor ID and account ID of the TE project.
# 1.2 Option 2 (manual integration)
For the manual integration option, you need to use the setAdditionalData() method in the AF SDK to configure the visitor ID and account ID of the TE project. The following is an example of Android code:
// Initialize the TE SDK
ThinkingAnalyticsSDK instance = ThinkingAnalyticsSDK.sharedInstance(this, TA_APP_ID, TA_SERVER_URL);

// Get the distinct ID of TE, corresponding to #distinct_id in TE
String distinctId = ThinkingAnalyticsAPI.GetDistinctId();

// Set the distinct ID to the AF SDK through setAdditionalData()
HashMap<String,Object> CustomDataMap = new HashMap<>();
CustomDataMap.put("ta_distinct_id",distinctId);
AppsFlyerLib.getInstance().setAdditionalData(CustomDataMap);

// It is strongly recommended to set the distinct ID again using setCustomerUserId()
AppsFlyerLib.getInstance().setCustomerUserId(distinctId);

// Initialize the AppsFlyer SDK
AppsFlyerLib.getInstance().init("appid", null, this);
AppsFlyerLib.getInstance().start(this);
...

// After calling the login method of the TE SDK to set the account ID, you need to synchronize the data with the AF SDK again
String accountId = "your_account_id";
instance.login(accountId);
HashMap<String,Object> CustomDataMap = new HashMap<>();
CustomDataMap.put("ta_distinct_id", distinctId);
CustomDataMap.put("ta_account_id",accountId);
AppsFlyerLib.getInstance().setAdditionalData(CustomDataMap);
After the above settings, the custom_data field in the returned data will contain two fields: ta_distinct_id and ta_account_id, and the customer_user_id will be equal to the #distinct_id.
# TE Third-party Integration Page Configuration
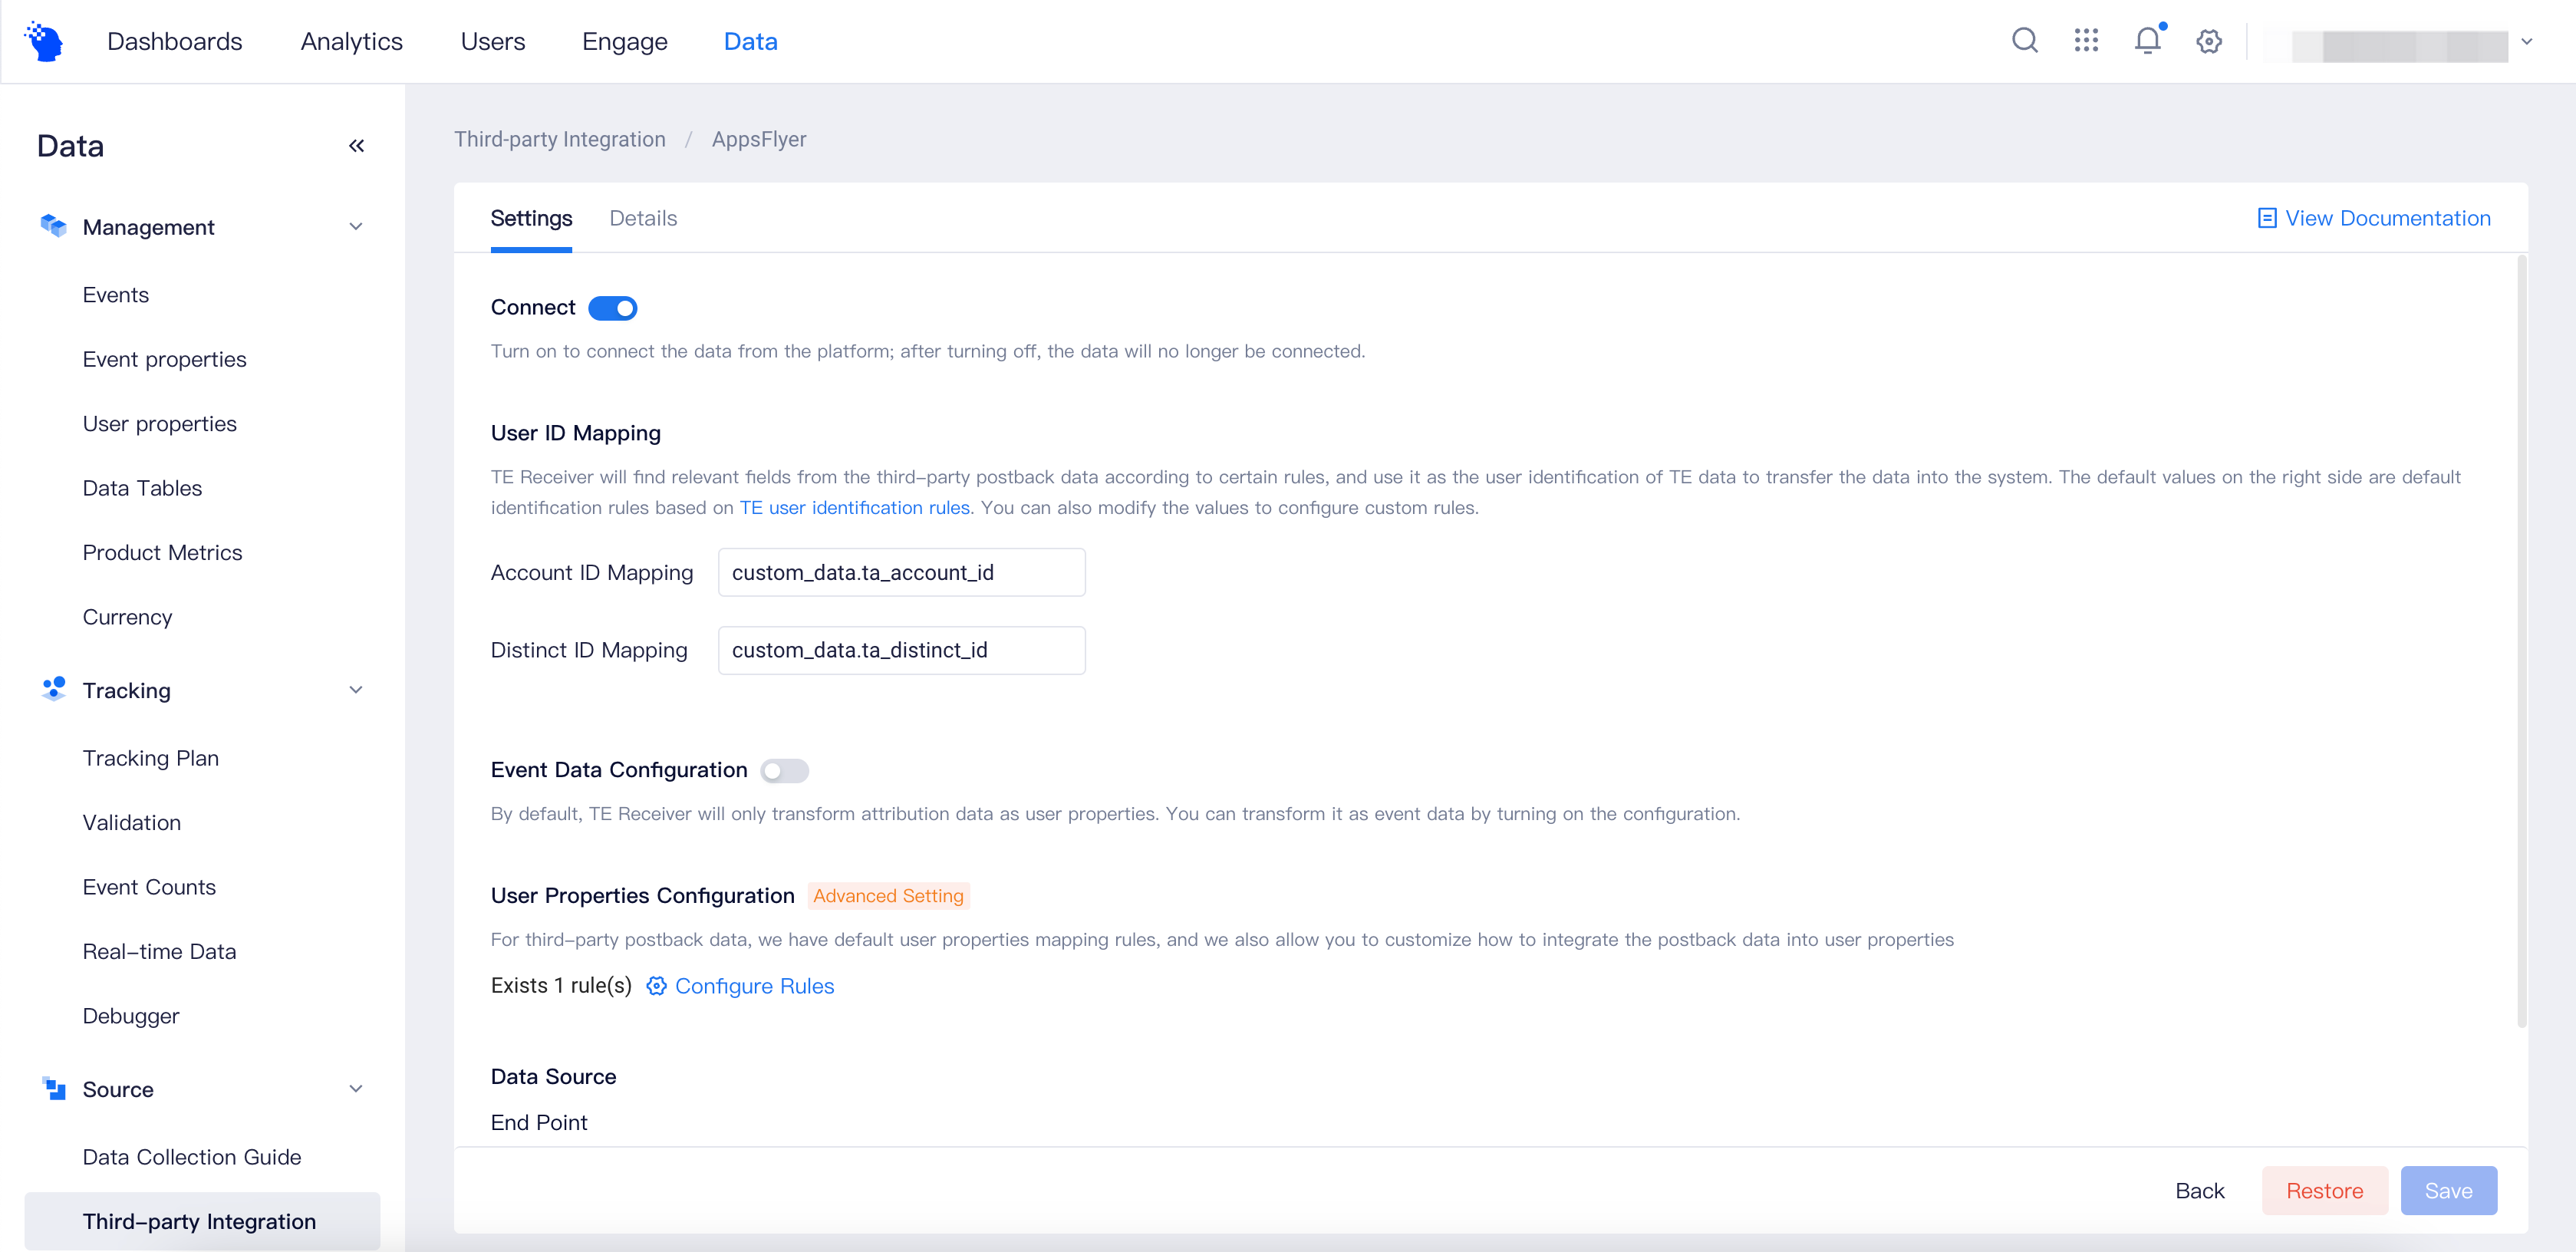
After completing the SDK configuration, you need to log in to the TE system backend and complete the configuration of AppsFlyer in the "Third-party Integration" module. The following figure shows the configuration interface of AppsFlyer. Please turn on the "Connect Switch" to start the configuration of AppsFlyer:
# 2.1 User ID Mapping
Since AppsFlyer returns user-level data, you need to set user identification rules for it, that is, the AF return data corresponds to the #distinct_id and #account_id fields. The TE system will set these fields as user identification fields in the data when converting and returning data based on this configuration.
If you have followed the client SDK configuration in this document,we strongly recommend the following configuration:
Account ID Mapping: custom_data.ta_account_id
Distinct ID Mapping: customer_user_id, custom_data.ta_distinct_id

# 2.2 Event Date Configuration
After turning on the "Event Data Configuration" switch, the returned data (including activation events and in-app events) will be written to the event table.
We recommend that you turn on event data storage. However, please note that by default, we will receive all AF return data. If too many event types are returned, it will cause the event volume of the TE project to be excessively inflated. Therefore, it is recommended to select only necessary events for return in the AF platform settings.

# 2.3 User Properties Configuration
By default, the TE system will automatically write the attribution fields in the AF return data to the standardized user properties. The following are the fields and their meanings that are written to user properties.
| AppsFlyer Fields | Standardized Field | Explanation |
|---|---|---|
| media_source | te_ads_object.media_source | Media Source |
| campaign | te_ads_object.campaign_name | Campaign Name |
| af_adset | te_ads_object.ad_group_name | Adset Name |
| af_ad | te_ads_object.ad_name | Ad Name |
TIP
The default rules for storing old version user properties are different from the current rules. Please pay attention to distinguish. If you need to merge old and new properties, you can use the virtual property function.
If you need to make changes, you can click "Configure Rules" to enter the storage rule configuration page, as shown in the figure below.
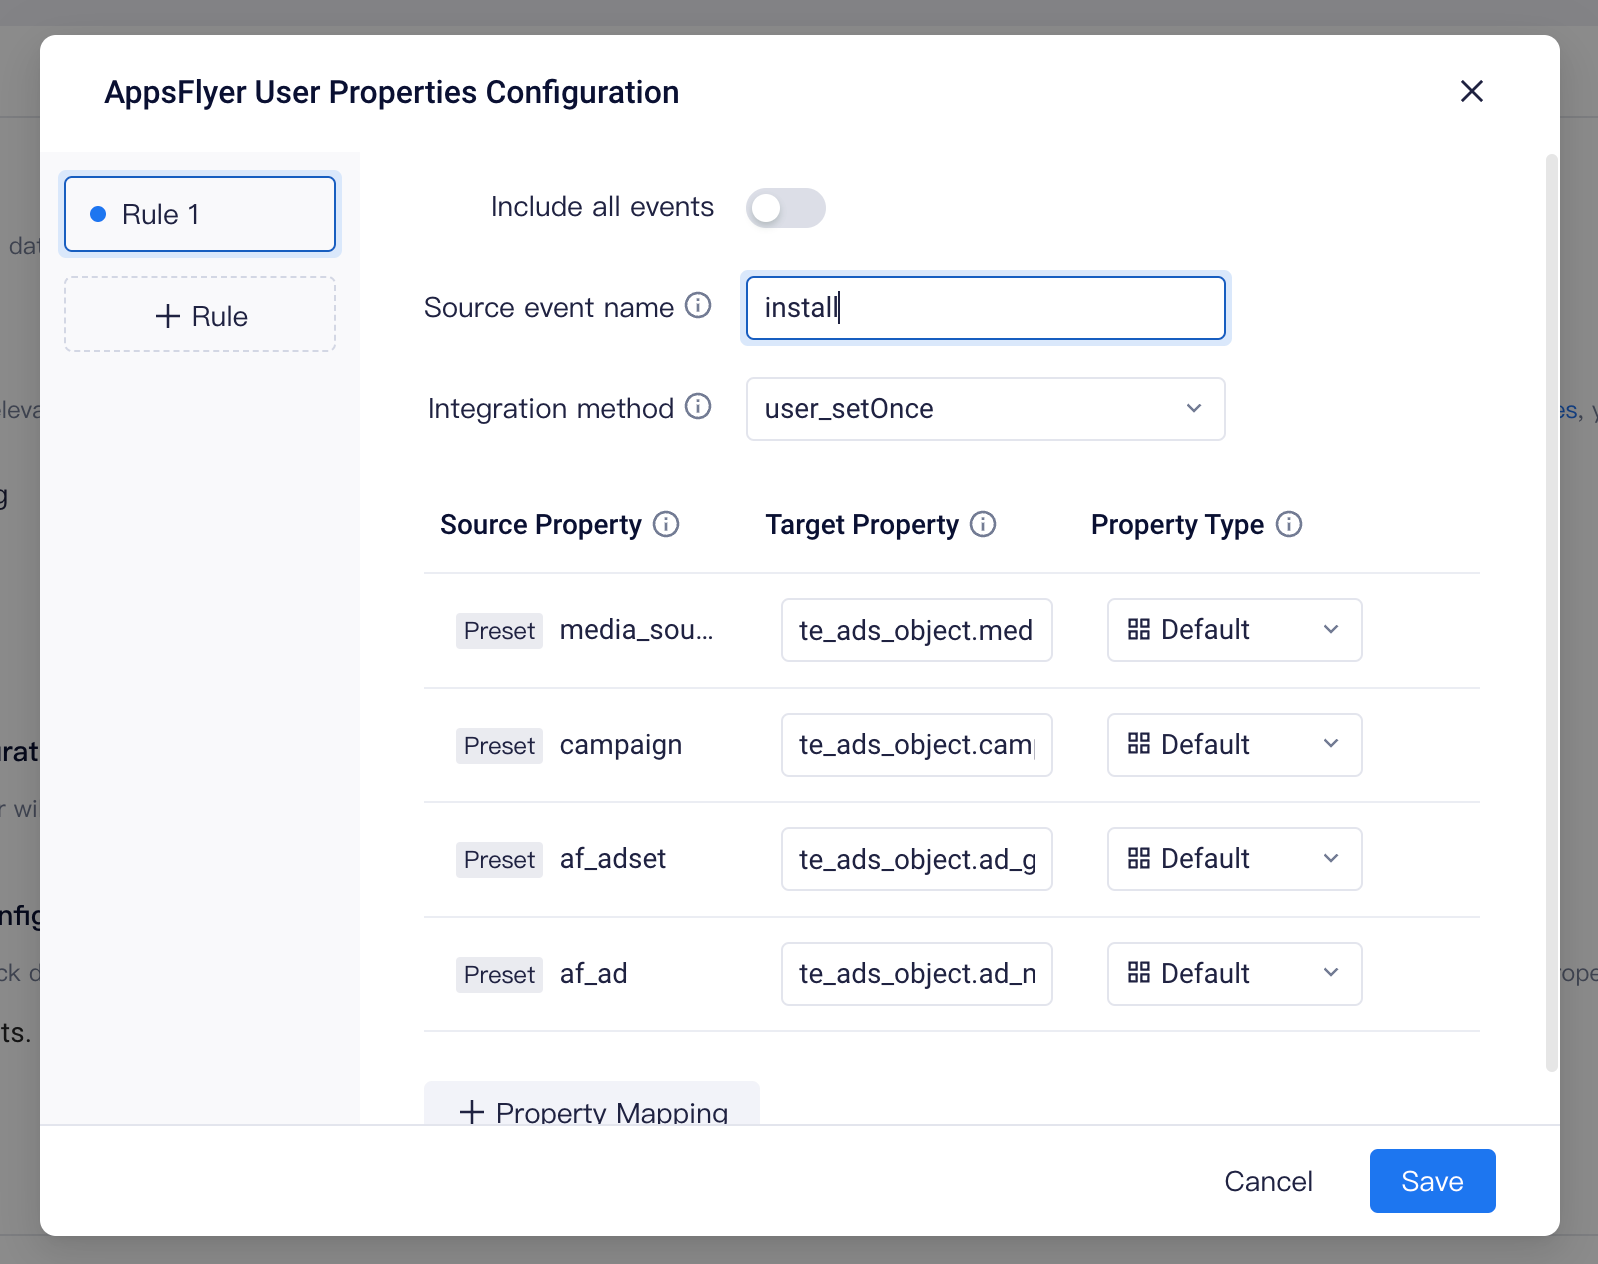
Here, you can modify which events the user properties come from. If you do not want user properties to be frequently written, you can turn off "Include All Events" and modify the source event name to "install". With this configuration, the TE system will only extract the fields that need to be written to the user properties from the install events returned by AF and write them in. The default storage method is user_setOnce, which means that only the information reported for the first time will be kept.
You can click the "Property Mapping" button to add fields that need to be written to the user properties; you can also click the "Rules" button on the left to add a new set of rules, such as if you want to extract advertising revenue from the monetization data returned by AF, and write it to the user properties in the form of user_add, in order to record the accumulated advertising revenue of each user.
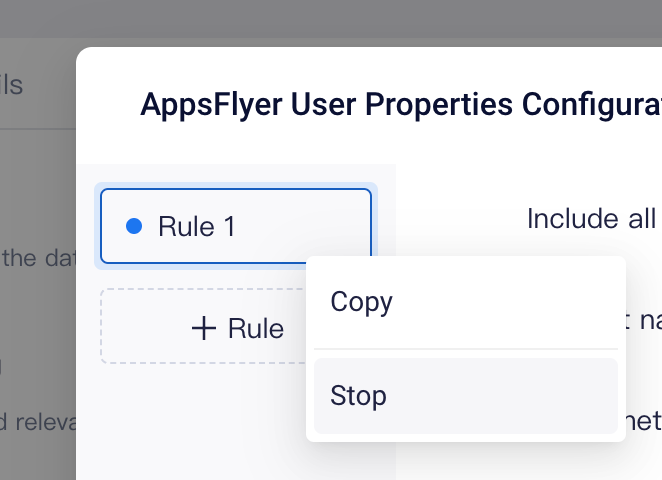
If you want to disable user property storage, you can stop all rules.
# 2.4 Data Source
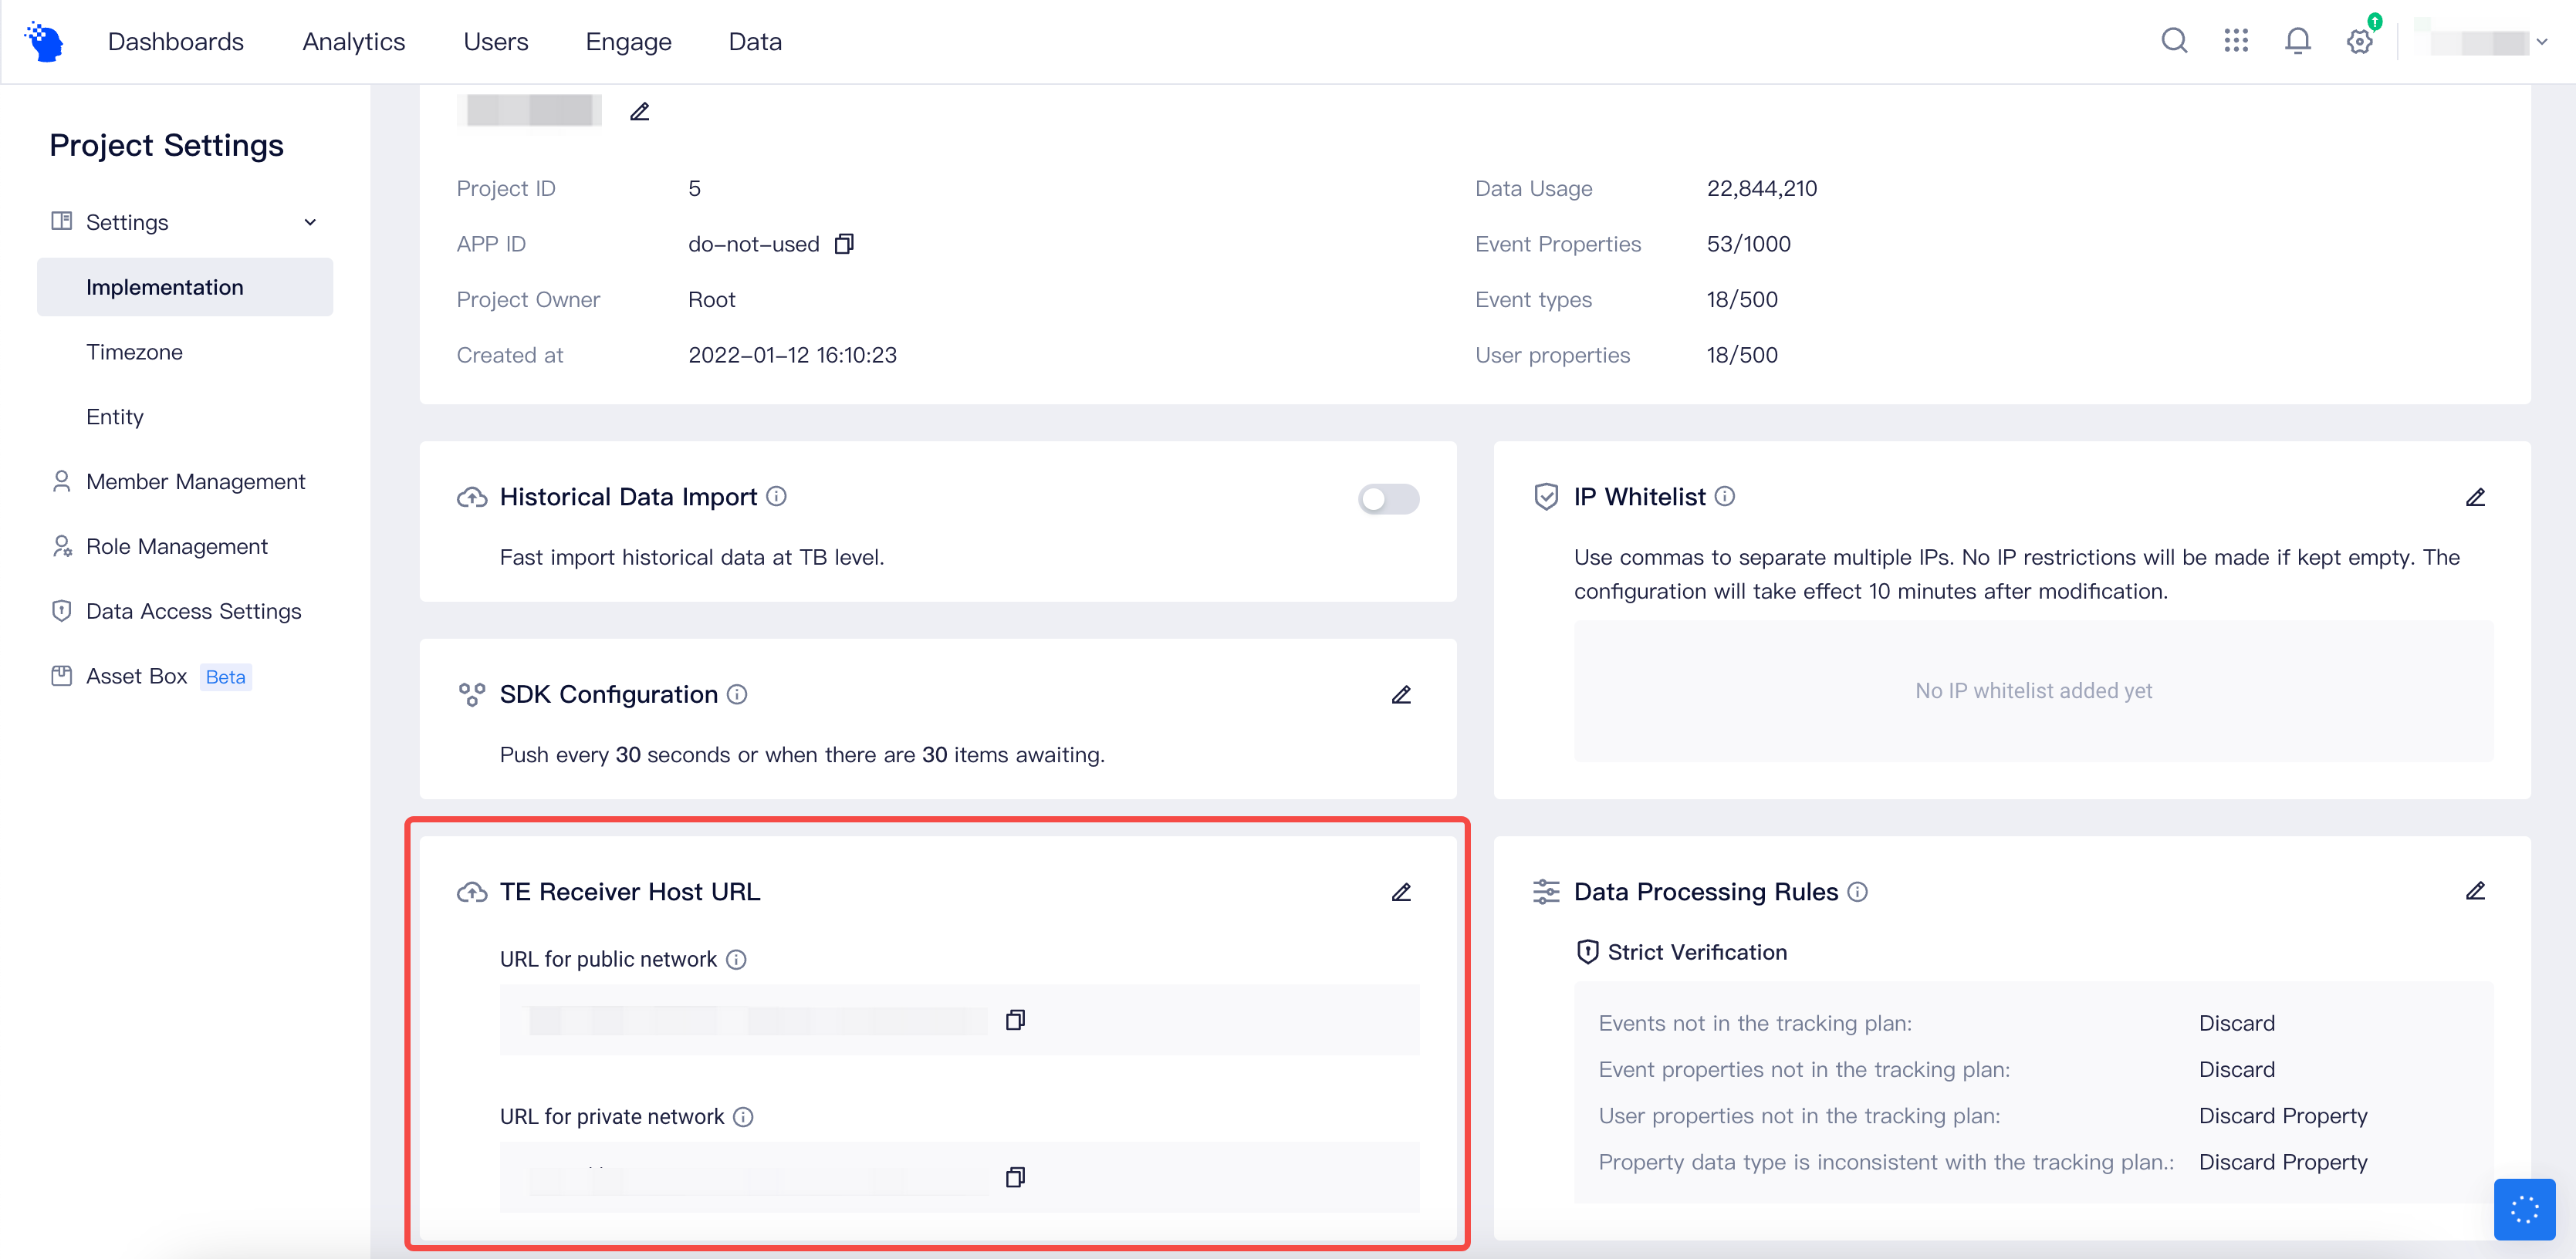
The data source displays the address at which the TE system receives data returned by AppsFlyer. Please copy this address directly and fill it in when configuring AF return data in the following steps:

If there is no address displayed here, please go to the "Project Settings"-"Access Configuration"-"Data Reporting Address" in the upper-right corner menu to configure the public address. This address is the data reporting address configured in the TE SDK. After configuring, go back to the "Data Source" on the AppsFlyer configuration page to copy the terminal address.
# AppsFlyer Push API Configuration
After completing the configuration in the TE system, please log in to AppsFlyer with an administrator account and go to "Integration"-"API Access" to find the Push API section. Set the Push API configuration as follows:
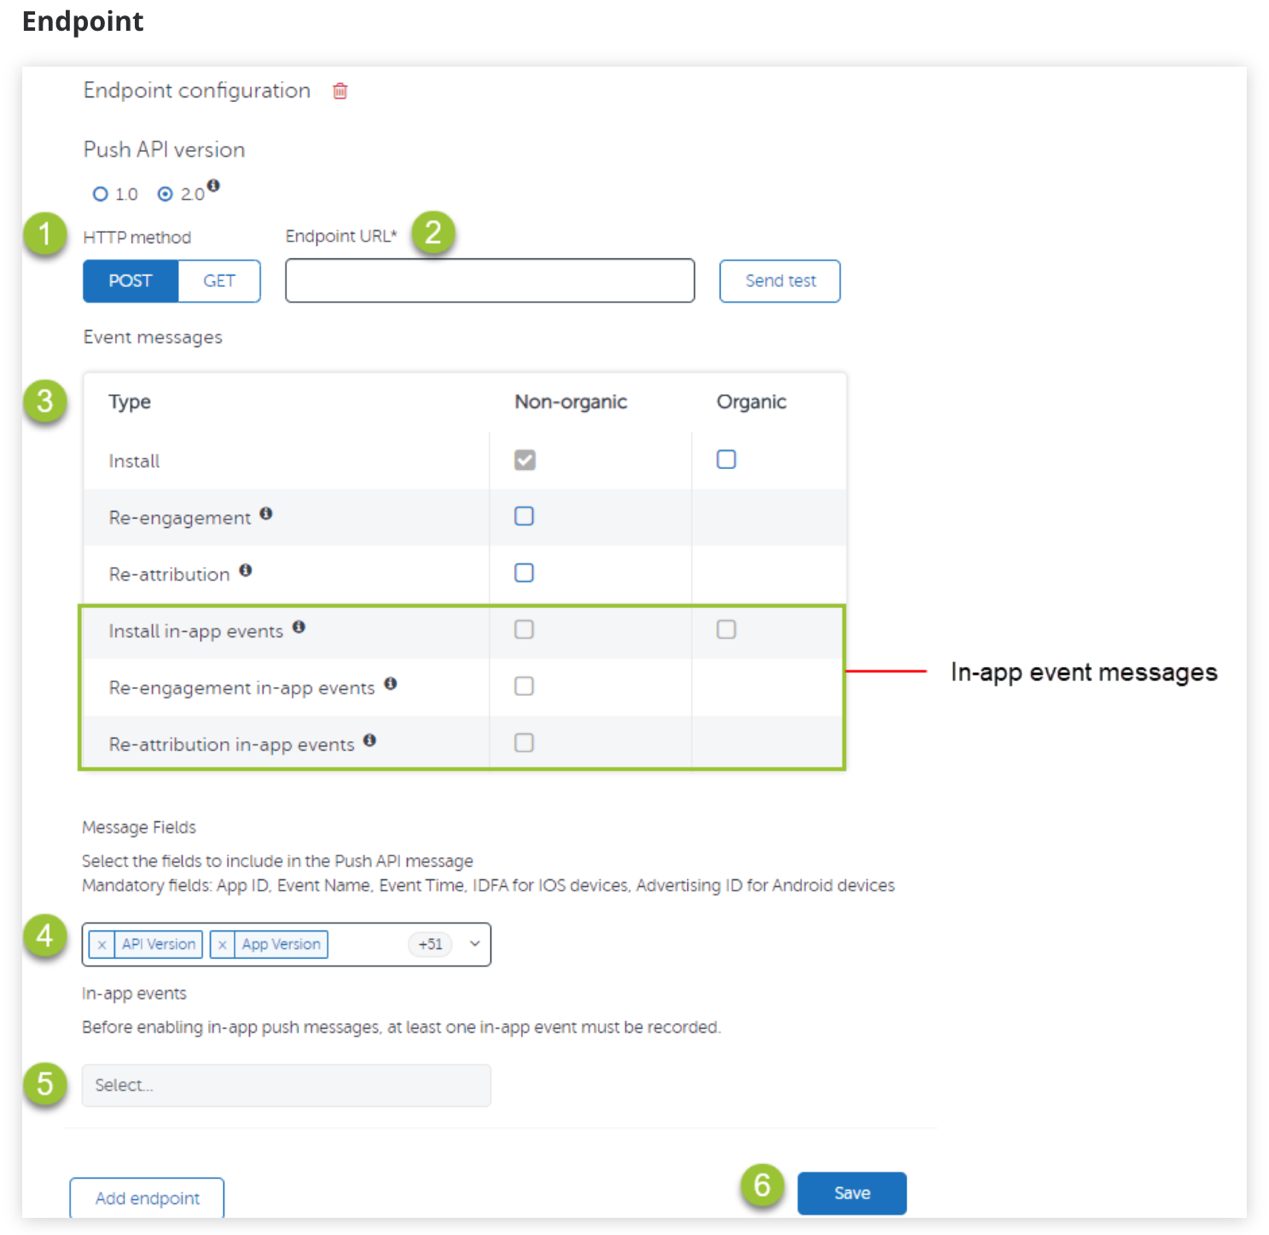
- Push API Version
- Please select version 2.0.
- HTTP Method
- TE supports both POST and GET for return data. We recommend using POST.
- Endpoint URL
- Get the terminal address from the "Data Source" section on the AppsFlyer configuration page in the TE backend, and copy and paste it directly.
- Event Messages
- At least select the "Install" event. If you want to return other in-app events, please check them here and fill in the event name in the "In-app Events" section.
- Message Fields
- The message fields should at least include the following information:
- Mobile attribution related fields: media_source, channel, af_adset, af_ad, etc.
- User identification related fields: custom_data, customer_user_id, event_value, etc.
- Fields that need to be used as event or user properties.
- Event related fields: event_time_selected_timezone
- The message fields should at least include the following information:
- In-app Events
- Select the events to be returned as needed. If you want to return in-app events, please check the "Install in-app events" in the Event Messages section.
::: caution
If you need to return Facebook data, you must agree to the Facebook Data Use Terms of Service (opens new window) in the AF backend Facebook channel settings, otherwise Facebook user-level data cannot be obtained.
:::
# Data Storage Logic
# 4.1 User Identification Rules
The TE system will identify users based on the configuration in "User ID Mapping" and associate the user-level data returned by AF with the corresponding user in the TE project.
Using the above image as an example, the user identification rules are as follows:
- Account ID: Check if the custom_data field contains ta_account_id. If it exists, set it as the data's #account_id. If not, leave it blank.
- Distinct ID: Check if the customer_user_id exists. If it does, set it as #distinct_id. If not, check if the custom_data field contains ta_distinct_id. If it does, set it as #distinct_id. If not, leave it blank.
- If both Account ID and Distinct ID are empty, the data will be considered invalid and discarded.
# 4.2 Event Storage Rules
- Associate the event data with the corresponding TE user based on the user identification rules.
- Use the event_time_selected_timezone field in the data, take the time and time zone information, set the time as #event_time, and write the time zone as #zone_offset. If this field is empty, use event_time as #event_time, and #zone_offset will be set to 0.
- The data event name is the event name in AppsFlyer.
- All other fields will be stored.
# 4.3 Standardized Fields
The following event properties will be standardized:
| Original Field | Standardized Field | Meaning |
|---|---|---|
| media_source | te_ads_object.media_source | Media Channel |
| monetization_network (Monetized Advertising Data) | te_ads_object.media_source | Monetization Channel |
| campaign | te_ads_object.campaign_name | Campaign Name |
| af_c_id | te_ads_object.campaign_id | Campaign ID |
| af_adset | te_ads_object.ad_group_name | Ad Group Name |
| ad_unit (Monetized Advertising Data) | te_ads_object.ad_group_name | Monetization Ad Unit Name |
| af_adset_id | te_ads_object.ad_group_id | Ad Group ID |
| af_ad | te_ads_object.ad_name | Ad Name |
| af_ad_id | te_ads_object.ad_id | Ad ID |
| placement (Monetized Advertising Data) | te_ads_object.placement | Ad Placement |
| af_cost_value | te_ads_object.cost | Advertising Cost |
| af_cost_currency | te_ads_object.currency | Currency of Paid Advertising |
| event_revenue | te_ads_object.revenue | Monetization Revenue |
| event_revenue_currency (Monetized Advertising Data) | te_ads_object.currency | Currency of Monetization Revenue |
| country_code | te_ads_object.country | Country Code |
| platform | te_ads_object.platform | Platform, such as Android, iOS, etc. |
| app_id | te_ads_object.app_id | App ID |
| app_name | te_ads_object.app_name | App Name |
# 4.4 User Properties Storage Rules
- Associate the event data with the corresponding TE user based on the user identification rules.
- Determine the user attribute setting logic as user_set, user_setOnce or user_add based on the user attribute storage rules.
- Get the fields that need to be written to the user table from the specified event or all events, and write them to the user table with the given attribute name and type.
# Data Storage Check
Finally, please check whether the TE system has received the callback data from AF. You can check it in the following ways:
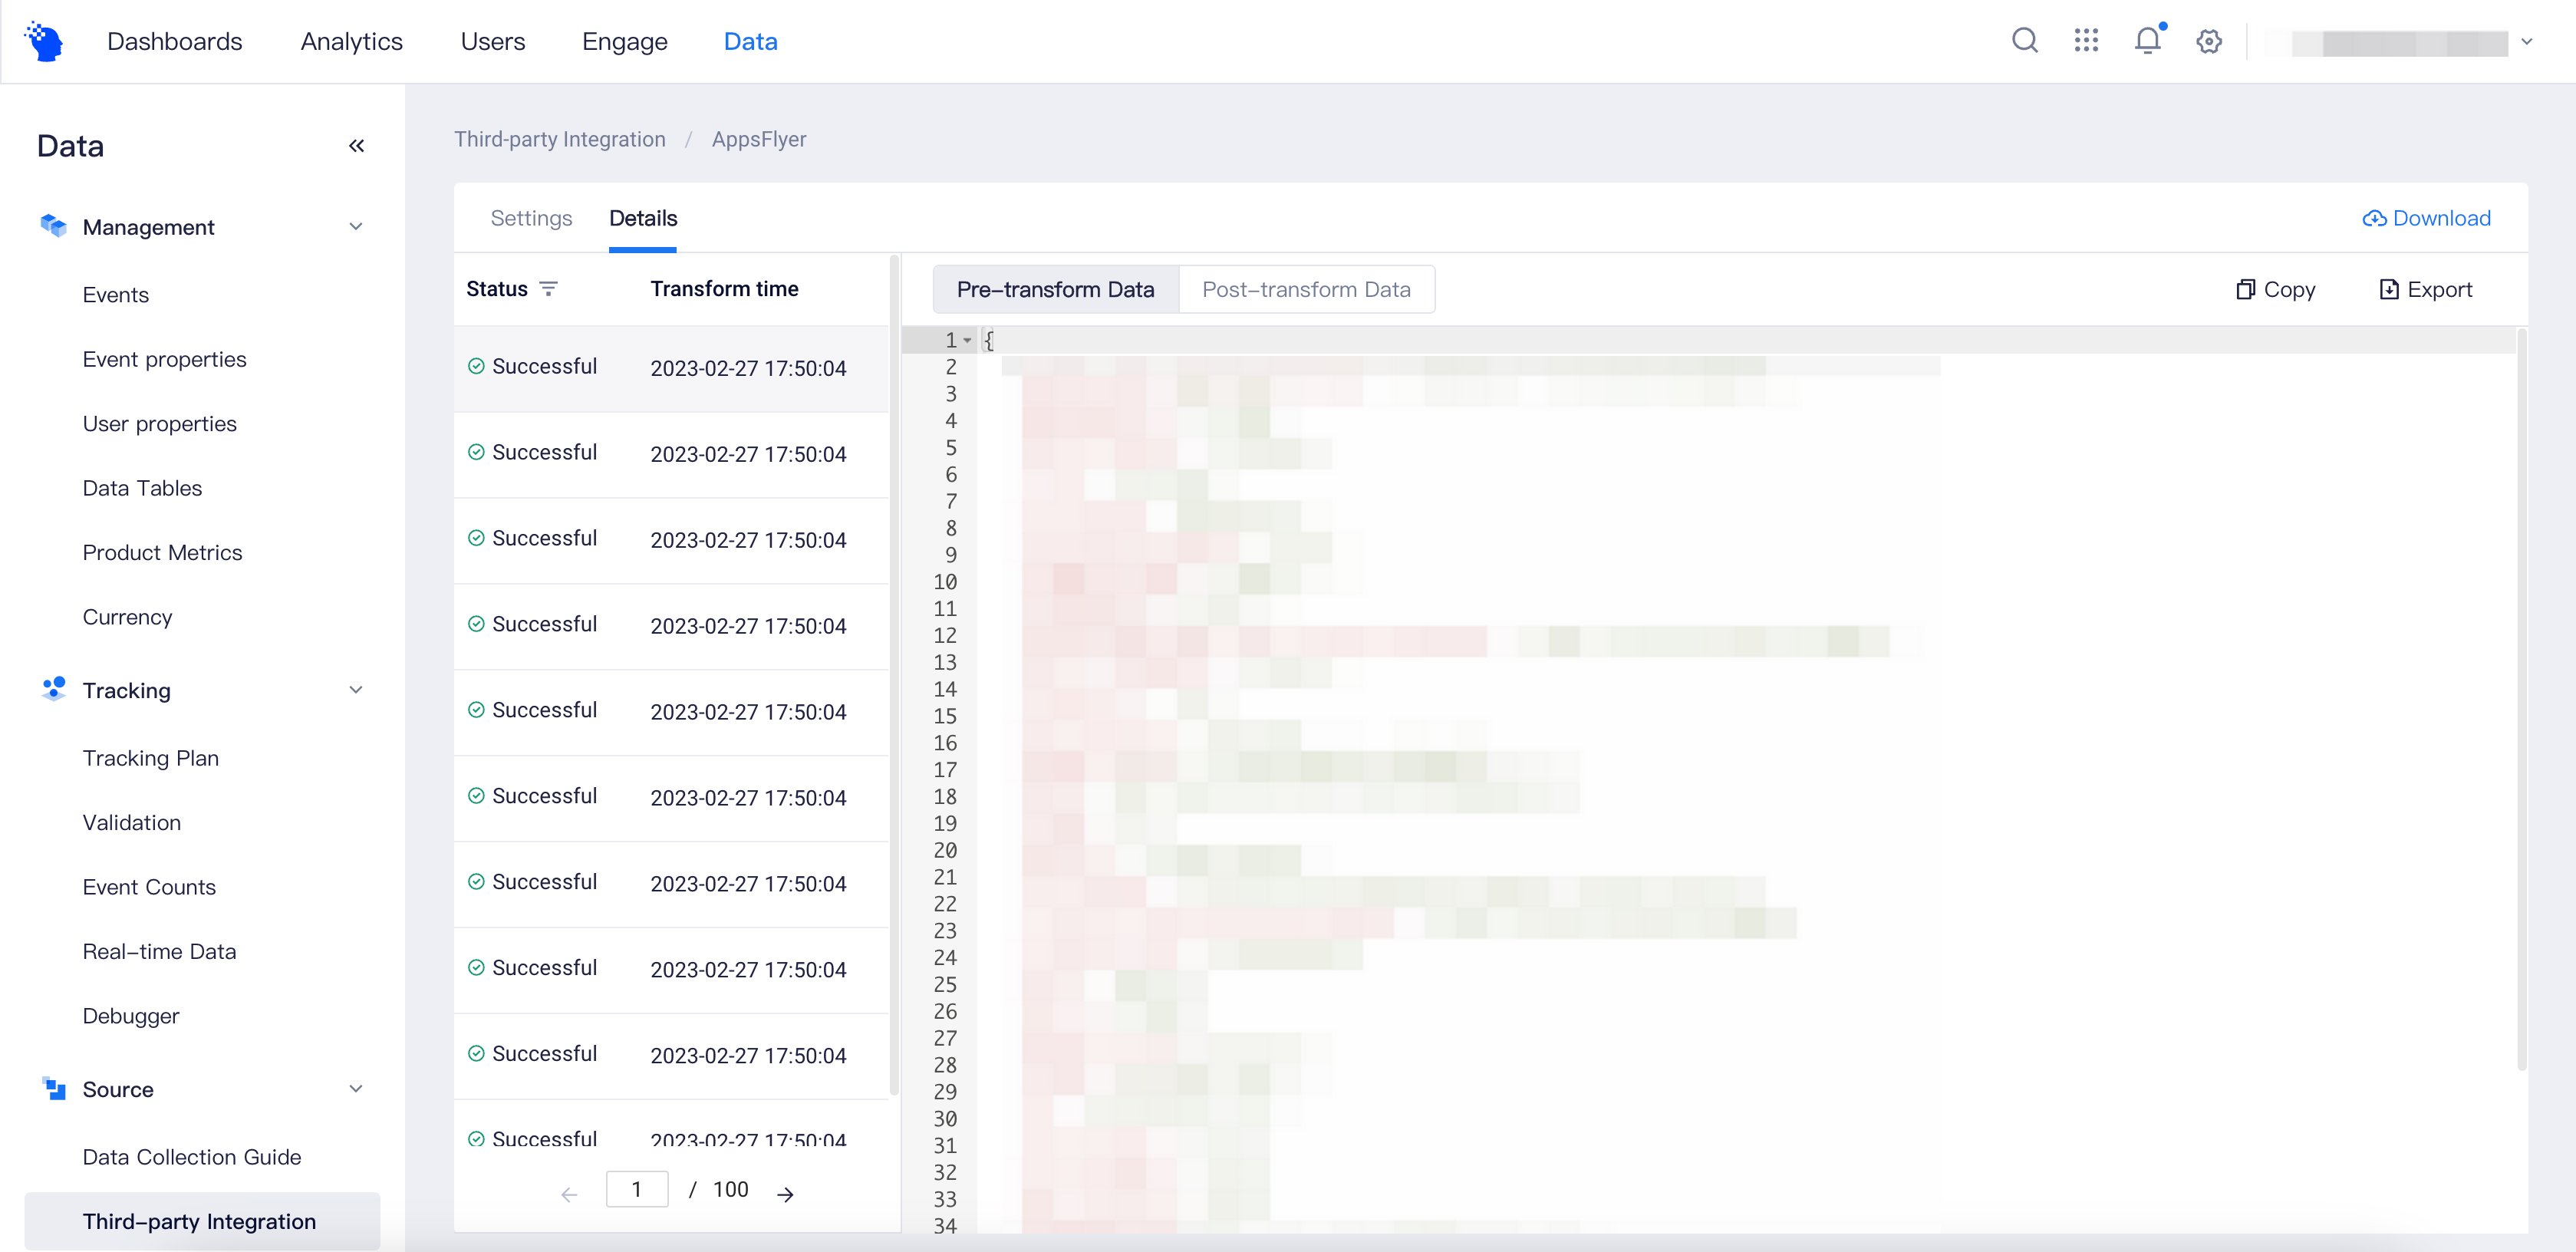
- Check in Details Tab Page
If the platform access status is "Accessed", it means that the data has been received from the platform and stored. At this point, you can view the last 1000 received data on the "Details" tab of the Integration page. Click on a specific row to view the details of the data, including the data before and after conversion, and you can copy or export the data, or click the download button on the upper right corner to download the complete data:
- Check in Other Product Modules
In addition to the Integration page, you can also check whether the callback events and user attributes have been created on the "Data Management" page.
You can also check whether the data has been stored by analyzing the data in analysis models, such as event analysis and user attribute analysis.
